Transform Your Ride with a Professional-Looking Finish
Are you tired of the same old interior design in your car? Do you want to give it a personalized touch that sets you apart from the crowd? Vinyl wrapping is the answer! This versatile and innovative technique has taken the automotive world by storm, offering car enthusiasts a unique way to transform their vehicle’s interior. From eye-catching designs to sleek, matte finishes, vinyl wrapping can elevate your car’s interior to the next level. But, with so many options available, it can be overwhelming to get started. That’s why we’ve created this comprehensive guide to help you master the art of vinyl wrapping.
In this article, we’ll take you through the benefits of vinyl wrapping, from enhancing aesthetics to protecting your investment. We’ll also cover the essential preparation steps, the vinyl wrapping process itself, and troubleshooting common issues that may arise. Whether you’re a seasoned DIY enthusiast or a novice looking to try something new, this guide is designed to equip you with the knowledge and confidence to achieve a professional-looking vinyl wrap.
So, what are you waiting for? Dive into the world of vinyl wrapping and unlock the full potential of your car’s interior. With the right techniques and tools, you can create a stunning, one-of-a-kind design that reflects your personality and style. Get ready to take your car to the next level and experience the thrill of driving a vehicle that truly stands out from the crowd!
1. Unlocking the Potential of Vinyl Wrapping
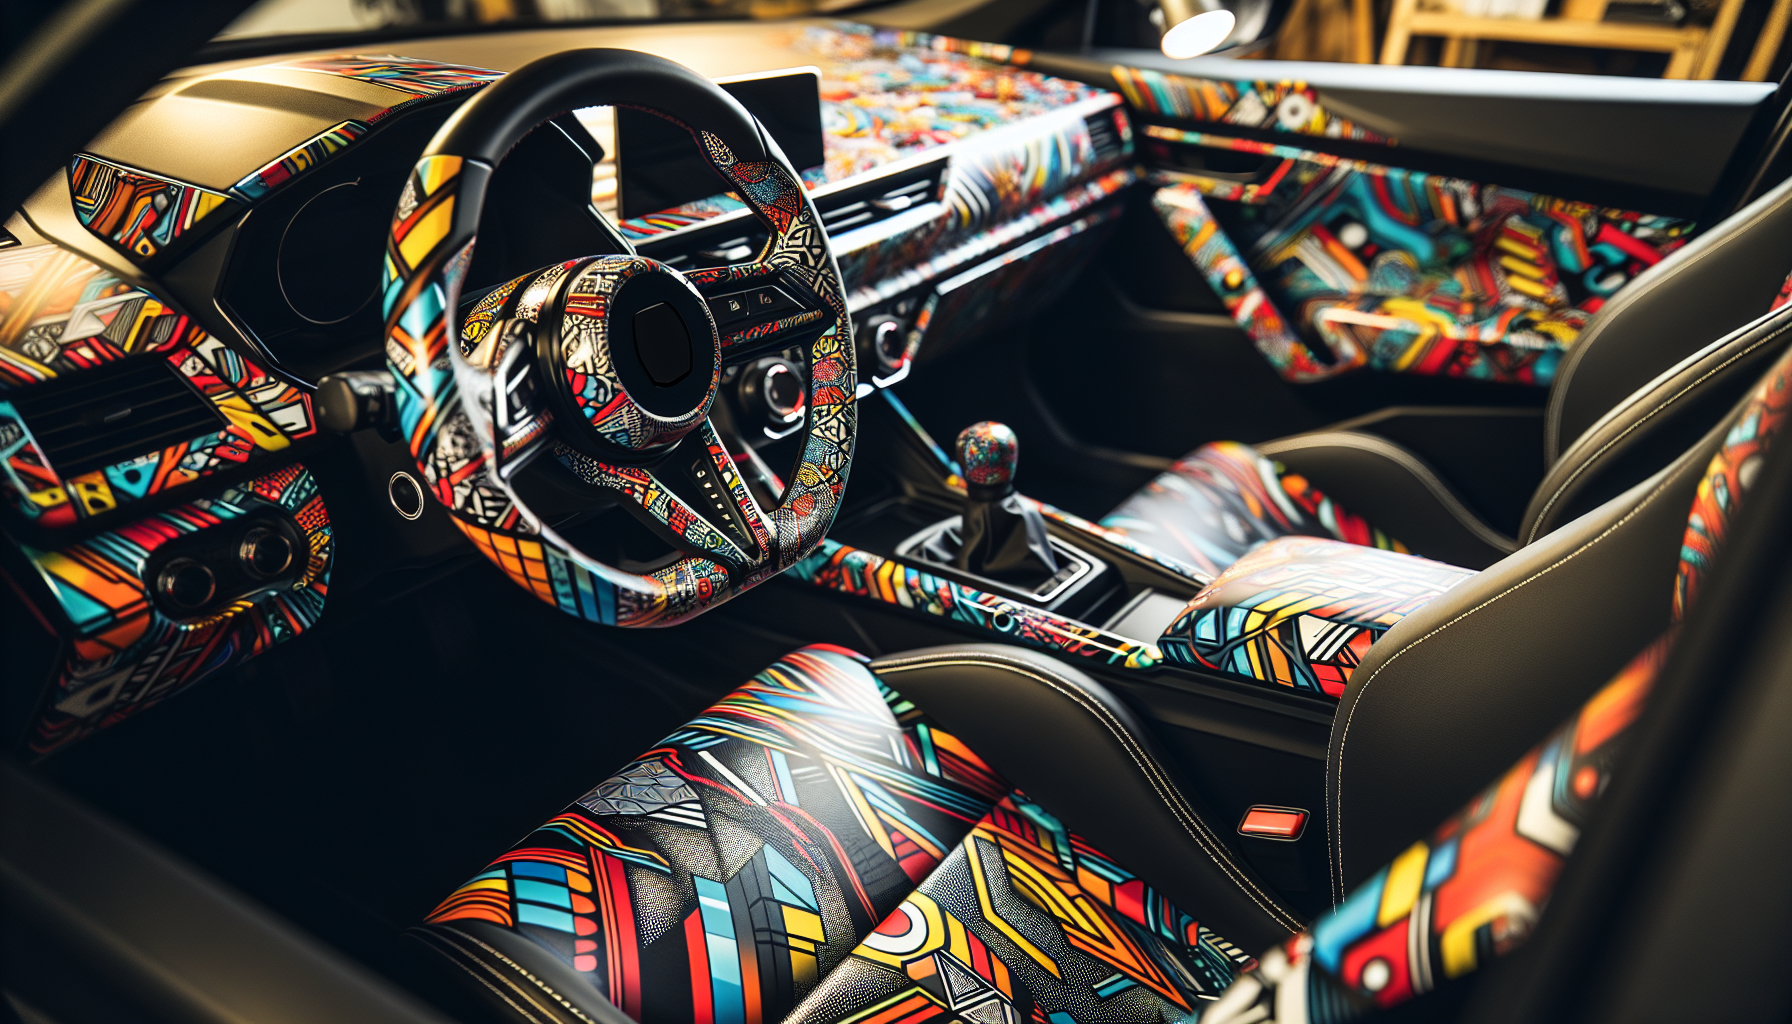
Vinyl wrapping is a game-changer for car enthusiasts, offering a world of possibilities for customizing and personalizing your vehicle’s interior. One of the most significant benefits of vinyl wrapping is its ability to elevate your car’s aesthetic appeal. With a vast array of colors, patterns, and finishes available, you can transform your car’s interior into a unique masterpiece that reflects your personality and style. Whether you’re looking to add a touch of luxury, sportiness, or sophistication, vinyl wrapping can help you achieve the desired look.
But vinyl wrapping is more than just a cosmetic upgrade. It’s also a valuable investment in your car’s future. By protecting your interior components from wear and tear, vinyl wrapping can help maintain your car’s resale value. This is especially important for car enthusiasts who plan to sell their vehicle in the future. With a vinyl-wrapped interior, you can ensure that your car looks and feels like new, even after years of use.
The best part? Vinyl wrapping is a versatile and affordable solution that can be applied to a wide range of interior components, from dashboards and trim to seats and consoles. With the right tools and techniques, you can achieve a professional-looking finish that rivals the best custom shops. So why settle for a bland, factory-standard interior when you can unleash your creativity and take your car’s design to the next level?
Enhancing Aesthetics
Vinyl wrapping is a powerful tool for elevating your car’s interior design and creating a unique look that sets you apart from the crowd. With a vast array of colors, patterns, and finishes available, you can transform your car’s interior into a stunning work of art. From bold, bright hues to sleek, metallic finishes, vinyl wrapping offers endless possibilities for customizing your car’s interior components. Whether you’re looking to add a touch of sophistication, sportiness, or luxury, vinyl wrapping can help you achieve the desired aesthetic.
One of the greatest benefits of vinyl wrapping is its ability to seamlessly integrate with your car’s existing design. By choosing a vinyl wrap that complements your car’s color scheme and interior style, you can create a cohesive, high-end look that’s sure to turn heads. And, with the ability to wrap individual components or entire sections of the interior, you can customize your car’s design to your heart’s content. Whether you’re looking to add a pop of color, create a bold accent wall, or simply add some texture and depth to your interior, vinyl wrapping is the perfect solution.
The best part? Vinyl wrapping is a highly versatile and adaptable solution that can be used to achieve a wide range of looks and styles. From retro-inspired patterns to futuristic, high-tech designs, vinyl wrapping offers endless possibilities for creative expression. So why settle for a bland, factory-standard interior when you can unleash your creativity and create a truly one-of-a-kind design?
Protecting Your Investment
Your car is a valuable investment, and protecting it from wear and tear is essential to maintaining its resale value. One of the most effective ways to do this is by vinyl wrapping your interior components. By applying a layer of vinyl to your dash, trim, and other surfaces, you can create a barrier against scratches, scuffs, and fading. This not only keeps your car looking like new, but also preserves its value for years to come.
Vinyl wrapping is especially important for high-wear areas like the dashboard, door panels, and console. These areas are prone to scratches and fading, which can significantly reduce your car’s resale value. By wrapping these areas with a high-quality vinyl, you can protect them from damage and keep your car looking like new. Additionally, vinyl wrapping can also help to hide existing imperfections, such as scratches or discoloration, giving your car a fresh, showroom-like appearance.
The best part? Vinyl wrapping is a cost-effective and non-invasive solution that can be applied to any type of vehicle. Whether you’re looking to protect your car’s interior from daily wear and tear, or simply want to maintain its resale value, vinyl wrapping is a smart investment. With its ease of application, durability, and versatility, vinyl wrapping is an essential tool for any car owner who wants to protect their investment and keep their car looking its best.
2. Preparing for a Flawless Vinyl Wrap
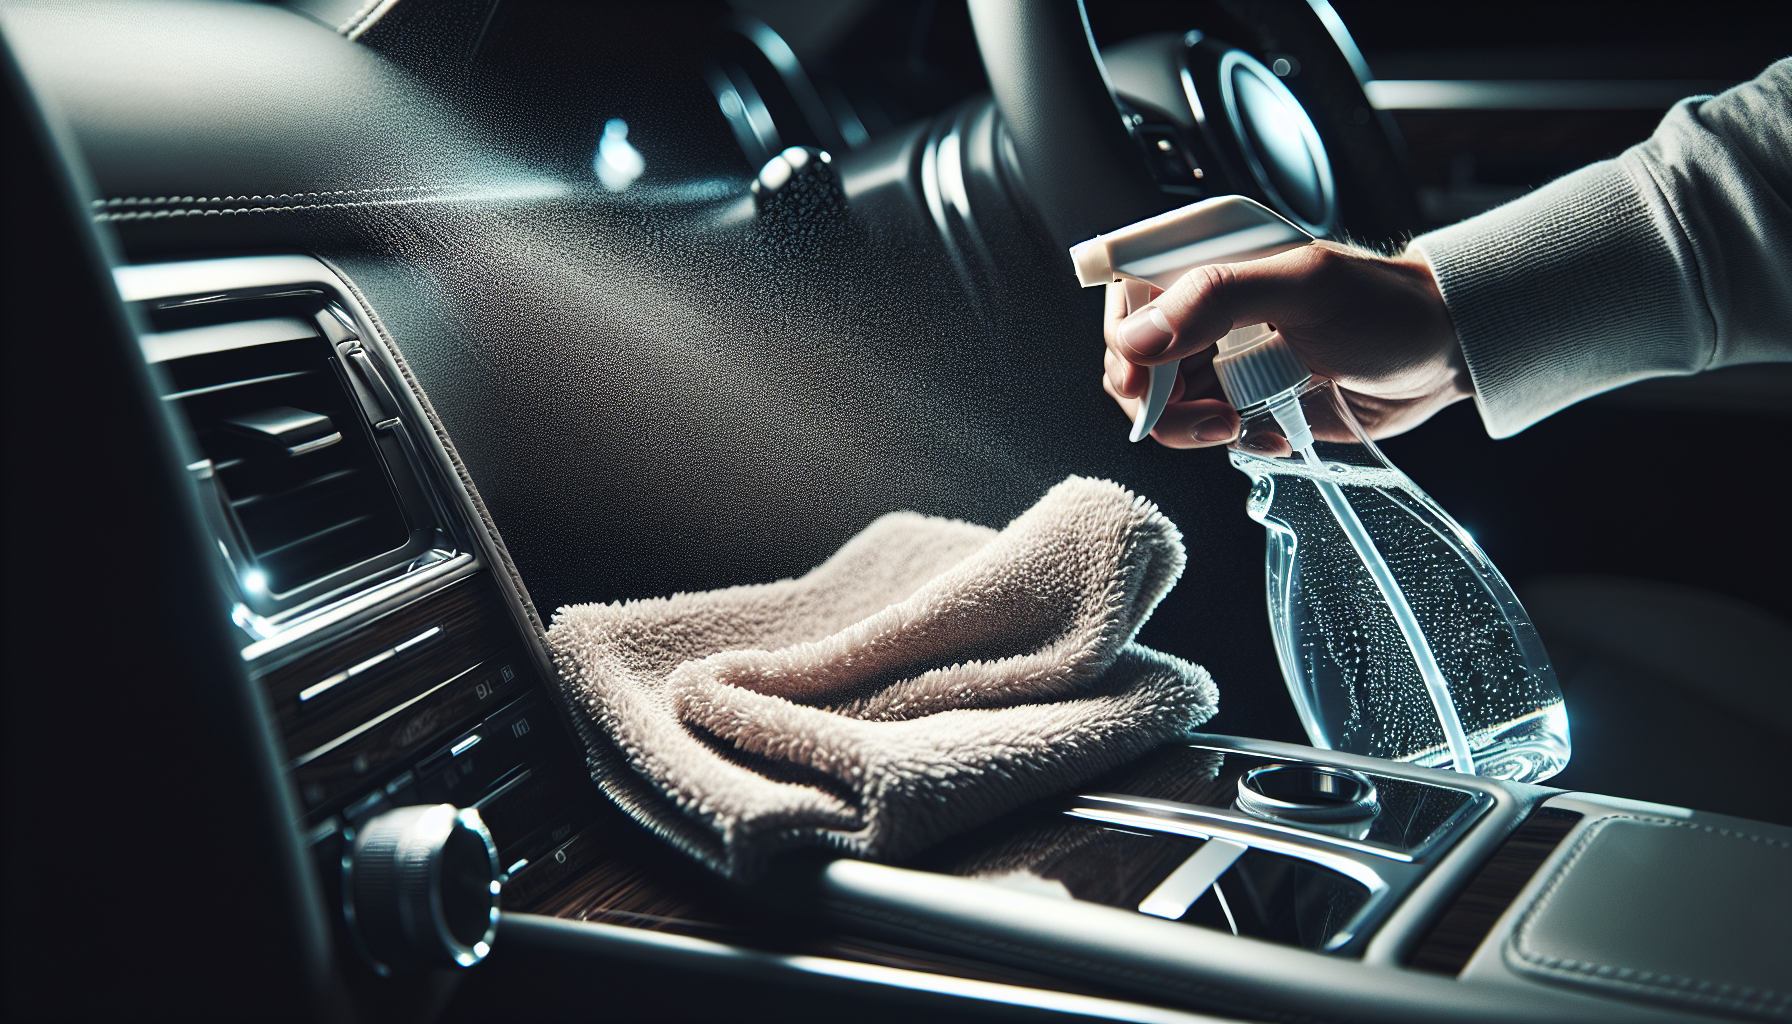
Before applying a vinyl wrap to your car’s interior components, it’s essential to prepare the surface to ensure a flawless finish. A well-prepared surface is key to achieving a professional-looking vinyl wrap that lasts for years to come. The first step in preparing your car’s interior components is to thoroughly clean the surface. This involves removing any dirt, dust, or debris that may be present on the surface. Use a mild soap and water solution to wipe down the surface, and dry it thoroughly with a microfiber cloth.
Next, inspect the surface for any imperfections, such as scratches or dents. If you find any imperfections, use a touch-up paint or a filler to repair them. This will ensure that the vinyl wrap adheres smoothly to the surface and prevents any air bubbles or wrinkles from forming. Additionally, remove any trim, emblems, or other components that may interfere with the vinyl wrap. This will give you a clean, smooth surface to work with.
By following these essential preparation steps, you can ensure that your car’s interior components are ready for a professional-looking vinyl wrap. Remember, a well-prepared surface is key to achieving a flawless finish. With a little patience and attention to detail, you can achieve a stunning vinyl wrap that transforms your car’s interior and turns heads on the road. So, take the time to prepare your surface, and get ready to unleash your creativity and take your car’s interior to the next level!
Choosing the Right Vinyl
When it comes to choosing the right vinyl for your car’s interior components, there are several factors to consider. With so many options available, it can be overwhelming to select the perfect vinyl for your project. However, by considering a few key factors, you can ensure that you choose a vinyl that meets your needs and exceeds your expectations. First, consider the color and finish of the vinyl. Do you want a glossy, matte, or metallic finish? Do you want a bold, bright color or a more subtle, neutral tone? Choose a vinyl that complements your car’s interior design and personal style.
Next, consider the durability and longevity of the vinyl. Will the vinyl be exposed to heavy wear and tear, or will it be used in a low-traffic area? Choose a vinyl that is designed to withstand the demands of your car’s interior. Additionally, consider the ease of installation and removal. If you plan to install and remove the vinyl wrap yourself, choose a vinyl that is designed for easy installation and removal. Finally, consider the warranty and support offered by the manufacturer. Choose a vinyl that is backed by a reputable manufacturer with a comprehensive warranty and excellent customer support.
By considering these factors, you can choose a vinyl that meets your needs and exceeds your expectations. Remember, the right vinyl can make all the difference in the success of your project. With a little research and planning, you can find the perfect vinyl for your car’s interior components and achieve a professional-looking finish that turns heads on the road. So, take the time to choose the right vinyl, and get ready to unleash your creativity and take your car’s interior to the next level!
Cleaning and Preparing the Surface
A smooth, bubble-free application is crucial to achieving a professional-looking vinyl wrap. To ensure a flawless finish, it’s essential to clean and prepare the surface properly. Start by wiping down the surface with a mild soap and water solution to remove any dirt, dust, or debris. This will help the vinyl wrap adhere smoothly to the surface and prevent any air bubbles or wrinkles from forming. Next, use a microfiber cloth to dry the surface thoroughly, paying extra attention to any areas with crevices or grooves.
Once the surface is clean and dry, use a surface preparation solution to remove any remaining impurities or residue. This will help the vinyl wrap bond strongly to the surface and prevent any peeling or lifting. Finally, use a lint-free cloth to wipe down the surface one last time, removing any excess solution or residue. By following these simple steps, you can ensure a smooth, bubble-free application that looks like it was done by a pro.
Remember, a clean and prepared surface is key to achieving a professional-looking vinyl wrap. By taking the time to properly clean and prepare the surface, you can avoid common mistakes like air bubbles, wrinkles, and peeling. With a little patience and attention to detail, you can achieve a stunning vinyl wrap that transforms your car’s interior and turns heads on the road. So, take the time to get it right, and get ready to unleash your creativity and take your car’s interior to the next level!
3. The Vinyl Wrapping Process: A Step-by-Step Guide
Are you ready to transform your car’s interior with a professional-looking vinyl wrap? Follow our expert instructions to achieve a stunning finish that turns heads on the road. The first step in the vinyl wrapping process is to measure and cut the vinyl to fit your car’s interior components. Use a precision measuring tool to get accurate measurements, and then cut the vinyl using a sharp utility knife or vinyl cutter. Make sure to leave a little extra material around the edges to ensure a smooth, seamless application.
Next, apply the vinyl to the surface of your car’s interior component, starting from the center and working your way outwards. Use a squeegee or credit card to smooth out any air bubbles or wrinkles, and apply heat with a heat gun or torch to ensure a strong bond. Make sure to work slowly and carefully to avoid any mistakes or imperfections. Finally, use a trim tool to remove any excess vinyl around the edges, and apply a finishing solution to protect the vinyl and give it a glossy finish.
With these simple steps, you can achieve a professional-looking vinyl wrap that transforms your car’s interior and turns heads on the road. Remember to take your time, work carefully, and follow our expert instructions to ensure a flawless finish. Whether you’re a DIY enthusiast or a seasoned pro, our step-by-step guide will help you achieve a stunning vinyl wrap that you can be proud of. So, get started today and unleash your creativity on your car’s interior!
Measuring and Cutting the Vinyl
Measuring and cutting the vinyl is a crucial step in the vinyl wrapping process. Accurate measurements are essential to ensure a seamless fit and a professional-looking finish. To get accurate measurements, use a precision measuring tool such as a caliper or a measuring tape. Measure the length, width, and any curves or contours of the surface you’re wrapping. Take note of any obstructions, such as vents, trim, or emblems, and plan your wrap accordingly.
When cutting the vinyl, use a sharp utility knife or a vinyl cutter. A sharp blade will help prevent the vinyl from tearing or fraying, and ensure a clean, precise cut. Cut the vinyl slightly larger than the measurements you took, leaving a little extra material around the edges. This will give you room to work with and ensure a smooth, seamless application. Use a cutting mat or a self-healing mat to protect your work surface and prevent the vinyl from getting damaged.
By following these measurement and cutting techniques, you can ensure a seamless fit and a professional-looking finish. Remember to take your time and work carefully, as accurate measurements and precise cuts are key to a successful vinyl wrap. With the right tools and a little practice, you can achieve a stunning vinyl wrap that transforms your car’s interior and turns heads on the road. So, get started today and take the first step towards a show-stopping vinyl wrap!
Applying the Vinyl Wrap
Applying the vinyl wrap is a crucial step in the vinyl wrapping process. With the right techniques and tools, you can achieve a smooth, bubble-free finish that looks like it was done by a pro. When applying the vinyl wrap, start from the center of the surface and work your way outwards. Use a squeegee or a credit card to smooth out any air bubbles or wrinkles, and apply heat with a heat gun or torch to ensure a strong bond. Make sure to work slowly and carefully, using a gentle touch to avoid stretching or distorting the vinyl.
One of the most common challenges when applying a vinyl wrap is handling air bubbles. To avoid air bubbles, make sure the surface is clean and dry before applying the vinyl. Use a bubble-releasing tool or a needle to puncture and release any air bubbles that do form. For excess vinyl, use a trim tool or a razor blade to carefully cut away the excess material. Make sure to apply a finishing solution to protect the vinyl and give it a glossy finish.
By following these expert tips, you can achieve a professional-looking vinyl wrap that transforms your car’s interior. Remember to take your time, work carefully, and use the right tools and techniques to ensure a smooth, bubble-free finish. With a little practice and patience, you can achieve a stunning vinyl wrap that turns heads on the road. So, get started today and take the next step towards a show-stopping vinyl wrap!
4. Troubleshooting Common Vinyl Wrapping Issues
Even with the best preparation and technique, vinyl wrapping can sometimes go awry. But don’t worry, we’ve got you covered! Our troubleshooting guide is here to help you overcome common obstacles and ensure a flawless finish. From air bubbles and wrinkles to vinyl lift and edge peeling, we’ll walk you through the most common issues you may encounter and provide you with expert solutions to fix them.
One of the most common issues is air bubbles. To fix them, simply use a needle or a bubble-releasing tool to puncture the bubble and smooth out the vinyl. For wrinkles, try applying heat with a heat gun or torch to relax the vinyl and smooth out the surface. And for vinyl lift and edge peeling, make sure to apply a strong bond with a high-quality adhesive and smooth out the edges with a trim tool.
By following our troubleshooting guide, you can overcome even the most frustrating vinyl wrapping issues and achieve a professional-looking finish. Remember, patience and persistence are key, and with a little practice and experience, you’ll be a vinyl wrapping pro in no time! So, don’t let common obstacles hold you back – use our troubleshooting guide to ensure a flawless finish and take your car’s interior to the next level.
Air Bubbles and Wrinkles
Air bubbles and wrinkles are two of the most common issues that can arise when applying a vinyl wrap. But with the right techniques and tools, you can easily remove them and achieve a smooth, flawless finish. When it comes to air bubbles, the key is to act quickly. Use a needle or a bubble-releasing tool to puncture the bubble and smooth out the vinyl. Apply gentle pressure to the area, working from the center of the bubble outwards. This will help to push the air out of the bubble and create a smooth, even surface.
For wrinkles, the solution is a little different. Try applying heat to the area using a heat gun or torch. This will help to relax the vinyl and smooth out the surface. Use a gentle touch to avoid stretching or distorting the vinyl, and work slowly to ensure a smooth, even finish. You can also use a squeegee or a credit card to smooth out any wrinkles or bubbles, applying gentle pressure to the area.
By following these techniques, you can easily remove air bubbles and wrinkles from your vinyl wrap and achieve a professional-looking finish. Remember to take your time, work carefully, and use the right tools and techniques to ensure a smooth, flawless finish. With a little practice and experience, you’ll be a vinyl wrapping pro in no time! So, don’t let air bubbles and wrinkles hold you back – use these techniques to achieve a flawless finish and take your car’s interior to the next level.
Vinyl Lift and Edge Peeling
Vinyl lift and edge peeling are two common issues that can occur when applying a vinyl wrap. But with the right techniques and tools, you can prevent and repair these issues and achieve a long-lasting, professional-looking finish. To prevent vinyl lift and edge peeling, make sure to clean and prepare the surface thoroughly before applying the vinyl. Use a strong bond adhesive and apply gentle pressure to the vinyl, working from the center outwards. This will help to create a strong bond between the vinyl and the surface, and prevent lifting and peeling.
If you do experience vinyl lift or edge peeling, don’t panic! These issues can be easily repaired with the right tools and techniques. For vinyl lift, try applying heat to the area using a heat gun or torch. This will help to relax the vinyl and create a strong bond with the surface. For edge peeling, use a trim tool to carefully trim the excess vinyl and reapply the edge. Make sure to apply gentle pressure and work slowly to avoid causing further damage.
By following these techniques, you can prevent and repair vinyl lift and edge peeling, and achieve a long-lasting, professional-looking finish. Remember to take your time, work carefully, and use the right tools and techniques to ensure a smooth, flawless finish. With a little practice and experience, you’ll be a vinyl wrapping pro in no time! So, don’t let vinyl lift and edge peeling hold you back – use these techniques to achieve a flawless finish and take your car’s interior to the next level.
What is the best type of vinyl to use for interior wrapping?
The best type of vinyl to use for interior wrapping is a cast vinyl, which is specifically designed for interior use. It is more flexible and conformable than other types of vinyl, making it easier to install and remove.
How long does it take to vinyl wrap a car’s interior?
The time it takes to vinyl wrap a car’s interior can vary depending on the size of the car and the complexity of the design. On average, it can take around 2-5 days to complete a full interior wrap.
Can I vinyl wrap my car’s interior myself?
Yes, you can vinyl wrap your car’s interior yourself, but it requires patience, skill, and attention to detail. It’s recommended to have some experience with vinyl wrapping or to take a class to learn the techniques and best practices.
How do I clean and maintain my vinyl wrapped interior?
To clean and maintain your vinyl wrapped interior, use a mild soap and water solution, and avoid using harsh chemicals or abrasive materials. Regular cleaning and maintenance will help to extend the life of the vinyl wrap.
Can I remove the vinyl wrap if I want to change the design or sell my car?
Yes, vinyl wraps can be removed without damaging the underlying surface. It’s recommended to use a heat gun and a specialized removal tool to make the process easier and safer.

